Blackboard is available to all faculty and students. If your school uses a different online platform, please consult your school’s IT department.
Please view all the videos and quick reference materials for Blackboard Assignments, Turnitin Assignments, and testing.
Overview
Overview Video
The basics for Blackboard Assessments
Log Into Blackboard
Log Into Blackboard
- Open an internet browser. (Google Chrome/Firefox recommended).
- Go to the following website: blackboard.usc.edu
- Click Sign in using your USC NetID.
- If prompted, input your USC netID and password, and then slick Sign in. You should now be logged into Blackboard.
Organize Courses by Term on Home Page
Organize Courses by Term on Home Page
- Access your course under My Courses module.
- Hover your mouse over the My Courses module.
- Click the gear icon in the upper right-hand corner of the module.
- Select the Group by Term check box.
- Click Submit. Courses are now grouped by semester.
Upload Syllabus
Upload Syllabus
- Access your course under My Courses module.
- Turn edit mode on.
- Click Syllabus on Course Menu, click Build Content.
- Click Item.
- In the Name field, enter the name of the file (e.g., Anthropology 101 Syllabus). This is the title of the file that your students will see.
- Click Browse My Computer to find the syllabus file.
- Under Standard Options select Yes next to Permit User to View this Content.
- Click Submit.
Make Course Available to Students in Blackboard
Make Course Available to Students in Blackboard
- From the Home screen, in the Tool module on the left side of screen.
- Click Qwickly (Faculty/ TAs)
- Click Course Availability.
- Click the On/Off button next to course. This will turn the course on and allow students to access the course.
Organize Files in Folders
- Navigate to your course in My Courses.
- Turn edit mode on.
- Click Content or Assignment from Course Menu on left side.
- Click Build Content.
- Under the New Page heading, select Content Folder.
- In the Content Information section of the Create Item page, input: Name, Color of Name and Text.
- In the Standard Options section:
- Select Yes next to Permit Users to View this Content.
- Date and Time Restrictions (optional): Select a date and time range for folder to be visible.
- Click Submit.
- Confirm you can see new folder in the content area where you added it. To enter folder, click link.
- Once a folder has been created, you can move other documents into it.
- Click the down arrow next to any document, select Move and follow online instructions to move documents to the appropriate folder.
Upload Course Content and Files to Course
- Navigate to your course in My Courses module.
- Turn edit mode on .
- Click Content or Assignments from Course Menu on the left side.
- Click Build Content.
- Click Item.
- In the Content Information section of the Create Item page, input Name of Item (required) and Text with description of the item (optional).
- In the Attachments section, click Browse My Computer to add a file. Follow instructions on screen to add a file to Blackboard. Repeat this step if needed.
- In the Standard Options select Yes next to Permit Users to View this Content.
- Click Submit.
- Click Content to confirm that the files have been uploaded to the course.
Copy Course Files
Copy Course Files
Add Content to Folder – Item and Assignment Link
Add Content to Folder – Item and Assignment Link
Create a Course Link and Add Folders
Create a Course Link and Add Folders
Media Files Uploads to Blackboard
Use these instructions for guidance on loading media files to Blackboard assignments, test questions, and announcements.
Media File Uploads
To embed media files, use the buttons found at the bottom left-hand corner of the tool panel (see image below).
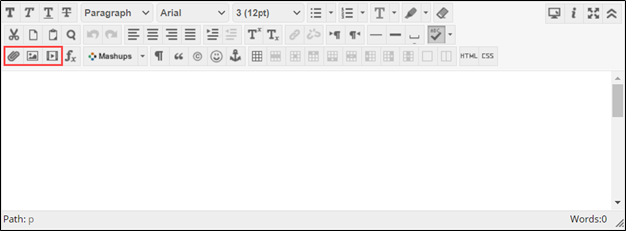
Click on the icon that corresponds to the correct file type (see table below). Note that large files, such as videos, may be difficult to copy between assignments, tests, and courses, and should instead be uploaded to Google Drive and linked through Blackboard.
| Type of File to Embed | Instructions |
|---|---|
| File | Click to browse your computer for a file (e.g., Word, PDF, PowerPoint, etc.) to upload. Note that several componets of Blackboard like assignments, items, and folders have an alternate option to upload a file directly using a separate button on the screen |
| Image | Click to browse your computer for an image file. |
| Video | Upload video to Google Drive and copy/paste the link in Blackboard (detailed instructions below). |
| Audio File | Click to browse for an audio file. See instructions below. |
Instructions for Audio
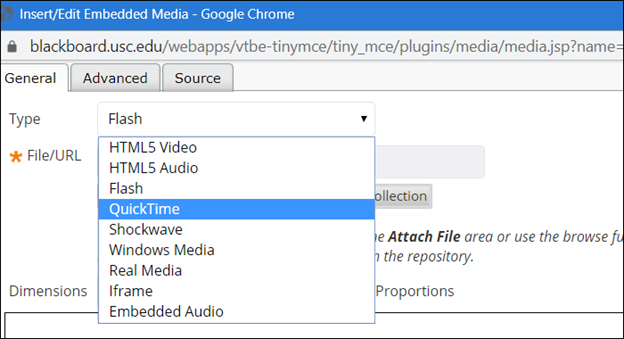
When you click the Insert/Edit Embedded Media button, a pop-up screen appears. First, select the file type (e.g. HTML5 Video, QuickTime, etc.). Next, select “Browse My Computer” or “Browse Content Collection” to locate and upload your file.
Instructions for Videos and Large Files
Access Google Drive
- Open your browser (Chrome is recommended).
- Go to drive.google.com.
- Log into Google Drive using your USC e-mail. You will be signed into Google Drive through Single Sign-on.
- In the upper left-hand corner, click
+New to add the desired folder or file to Google Drive.
- Click Share or Share Get link.
- Under “Get link”, click the Down arrow.
- Choose who to share the file with and what roles they will have: Viewer, Commenter, or Editor. Click here to learn more about these roles.
- Click Copy link Done.
- Paste the link in Blackboard.
- For additional instructions on how to use Google Drive, go to the Google Drive Support site.
Templates
Import the CET Basic Course Template
Blackboard allows instructors install a course template that can be used to organize their online course with learning modules, links to assignments, grades, and zoom meeting rooms, etc. The process involves uploading a zip file into an empty course site.
The following video explains the process for uploading a template zip file into an empty Blackboard course site.
If you require assistance with using a Blackboard template, contact blackboard@usc.edu.
Download the Course Template Zip File
- Click here.
- A zip file will automatically download to the Downloads folder on your PC or Mac.
- View the Basic Course Template Overview video for step-by-step instructions for importing the zip file.
Tour of the Blackboard Template
This video provides a tour of the CET Basic Course Template.
Communication
Create Announcements
Create Announcements
Use announcements to inform students’ exam schedules, assignment due dates, changes to the syllabus and corrections/clarifications of materials.
- Navigate to your course in My Courses module.
- Turn edit mode on .
- In the course menu on the left-hand side of the screen, click Announcements.
- On the Announcements screen, click Create Announcement.
- In the Announcement Information section of the Create Announcement page, input:
- Subject (required): Subject of the announcement.
- Message: The text of the announcement.
- In the Web Announcement Options section:
- Duration: Select whether you wish to restrict the dates of the announcement. If you do, input the dates.
- E-mail Announcement: Select if you wish to send an e-mail copy of the announcement to all course users.
- Click Submit. The announcement will be posted and distributed based on your selections.
Send Email
Use the e-mail feature in Blackboard to contact students, TAs, staff, co-instructors, or groups of students. You will receive a copy of the e-mail, but Blackboard does not keep a record of sent e-mails. Nor does Blackboard recognize file or e-mail addresses with special characters.
- Navigate to your course in My Courses module.
- Turn edit mode on .
- In the course menu on the left-hand side of the screen, select Course Tools à Send Email.
- On the Send Email page, select the group of users to receive the e-mail. This may be all users, or you may select individual recipients.
- Click Select Users to select individual users.
- In the Email Information section of the Select Users screen, the names or groups of users you may include on the e-mail are displayed in the Available to Select field.
- Double-click the name(s) you wish to include on the e-mail.
- These names will appear in the Selected field.
- In the Subject field, input the subject of your message.
- (Optional) At the bottom of the screen, click Attach a file to add an attachment to the e-mail.
- Click Submit. Your e-mail will be sent.
Create a Discussion Board Forum and Threads
Create a Discussion Board Forum and Threads
- Navigate to your course in My Courses module.
- Turn edit mode on
.
- Click Content or Assignments from Course Menu on the left side.
- Click Tools à Discussion Board
- On the Discussion Board page, click Create Forum on the Action Bar.
- On the Create Forum page:
- Input the name of the forum in the Name (e.g., Discussion forum for the week of 3/16). Users click this name to access the forum.
- In the Description field, enter a description of the forum. (Optional)
- Under Forum Availability, select Yes.
- Under Forum Settings, select the settings for your forum:
- Choose whether to allow anonymous posts, file attachments, thread creation, subscription, and member rating of posts.
- Choose whether to grade discussion posts. Once grading has been enabled, a Grade Center item is created.
- Select the Grade Forum option and type a point value to evaluate students on performance throughout the forum.
- Select the Grade Threads option to evaluate students in each thread chosen.
- Click Submit.
Set up Zoom Link in Blackboard Tools
Set up Zoom Link in Blackboard Tools
Assignments
Overview Video
Create, edit, and grade assignments in Blackboard
Create Assignments
Create assignments in Blackboard
- Navigate to your course in My Courses module.
- Turn edit mode on
.
- In the course menu on the left-hand side of the screen, click Assignments.
- On the Assignments screen, Select Assessments > Assignment.
- In the Assignment Information section of the Create Assignment page, input:
- Name (required): Name of the assignment.
- Color: Select a color for the assignment or accept the default.
- Instructions: Instructions for completing the assignment.
- (Optional) In the Assignment Files section, use the buttons to upload any files that students need to the assignment.
- In the Due Dates section, enter the date and time that the assignment is due.
- (Required) In the Grading section, enter the number of points a student can earn for the assignment in the Points Possible field.
- In the Availability section, select the Make the Assignment Available check box or set a date range to limit when the assignment will be displayed.
- Click Submit.
Edit Assignments
Edit assignments in Blackboard
Grade an Assignment
Grade assignments in Blackboard
- Navigate to your course in My Courses module.
- Turn edit mode on
.
- In the course menu on the left-hand side of the screen, select Grade Center à Full Grade Center.
- Each student enrolled in the course is listed vertically, and assignments are displayed in columns. Click in the cell in a student row that corresponds to the column with the assignment you wish to grade.
- Enter the number of points the student received for the assignment, and then press Enter.
- Repeat the process for the remaining students. Once you have entered all grades, the task is complete.
Grade Items Using the “Needs Grading” Link
Grade Items Using the “Needs Grading” Link
Tests
Create a Test
Create Test Questions
- Turn edit mode on
.
- Click Course Tools from the Control Panel.
- Click Tests, Surveys, and Pools.
- Select Tests.
- Select Build Test in the Action Bar.
- Enter a Name, Description, Instructions and click Submit.
- Click Question Settings in the top right of your window.
- Check the appropriate settings for your test questions,
- These question settings control the options available to you when creating test questions.
- Not all options are available for all question types.
- Then click Submit.
- Select the question type you want to add to the test from the action bar.
- Create the question.
- Continue to add questions to your test until you have achieved the desired total points and number of questions.
- Select OK. This will return you to Tests, Surveys, and Pools.
- You must can deploy or make the test available to your students.
Build a Test
Build a Test
Create True-False Question
Create True-False Questions
Create Multiple Choice Questions
Create Multiple Choice Questions
Create Essay Question
Create Essay Question
Create File Response Question
Create File Response Question
Create Multiple Answer Question
Create Multiple Answer Question
Edit Test Questions
Edit Test Questions
Copy Test Questions
Copy Test Questions
Deploy a Test
Deploy a test
Test Your Test
Test your test
Grade a Test
Grade a test
Edit Test Options
Edit Test Options
Copy a Test
Copy a Test
About Blackboard
Blackboard is the university’s Learning Management System hosted in the cloud. It can be used by instructors to post and distribute course content such as syllabi and handouts; to communicate with students via discussion boards, announcements, and email messages; to collect student work and assignments; to assess student learning through quizzes and online assignments, and to grade assignments. Blackboard Collaborate also allows for face-to-face interaction and even breakout rooms for small group discussions.