Launch a Zoom Session from Brightspace
Zoom can be launched from Brightspace, and recordings can be found by following the steps outlined in the Zoom Access Guide.
How to Record a Session
If you forgot to record a meeting automatically when you scheduled it, you may record after it has started.
- Place your cursor on the screen.
- Click Record in the bar at the bottom.

- Select Record to the Cloud.
- The image appears in the upper right-hand corner while you are recording.

- Click the pause button to pause the recording.
- When paused, click play to resume the recording.
- Click stop to end the recording.
- When you end the recording, click Yes to confirm that you want to stop the recording.
- You will receive an e-mail link with to your recorded meeting one it’s loaded. However, you must publish the recording for course participants to be able to view it.
Use Breakout Rooms
You may divide the class participants into groups and set them up in breakout rooms for group discussions during an online class.
- Select More → Breakout Rooms.
- On the Create Breakout Rooms pop-up screen:
- Indicate the number of breakout rooms you wish to set up.
- Select automatic or manual assignments. (For manual rooms you will assign class participants to specific rooms)
- Click Create Rooms.
- Click Open All Rooms. At this point, all students will be in breakout rooms.
- When you are ready to resume the class, click Close All Rooms. All participants will return to the meeting.
- Close the Breakout Room pop-up window.
How to End Session
- Place your mouse in the meeting window.
- Click End Meeting.
- Click the End Meeting for All button.
- The meeting will end for all participants, and audio and video will be terminated.
- If you were recording your session, the recording will end and be available online shortly
Mute and Unmute Participants
All Participants
As the meeting leader, you can mute all participants, and control how participants can unmute their microphones in a Zoom meeting. It is a best practice to place all participants on mute, whenever possible.
- At the start of a meeting, ask all participants to place themselves on mute.
- To place all participants on Mute, as the meeting host, click
- In the Participants panel, click

- In the Mute All pop-up window, ensure the checkbox for Allow Participants to Unmute Themselves selected.

- Click Yes.
In the Participants panel, all participants will display as muted

- To Unmute participants, click Unmute All at the bottom of the Participants panel.

Individuals
- In the Participants panel, place your cursor over the name of the person you wish to mute.
- Click Mute.

- The individual will display as muted
- To Unmute the individual, place your cursor over the name of the person and click Unmute.
Raise Hand Feature
Meeting participants may raise their hand electronically during a call. Once you acknowledge, you may lower it.
- As a presenter in Zoom:
- When sharing a screen, the name of the student who has raised their hand appears as a pop-up.
- When not sharing a screen, a raised hand appears in the box with the student’s name.
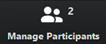
- Click Management Participants in the meeting bar. The Participants window will appear.
Click next to the name of the student who has raised his/her hand.

- Click Lower Hand. The hand symbol disappears, and you may close the Participants window.
Poll Class
Instructors may set up polls to be used during an online lecture. Polls should be setup directly in the Zoom app before starting a Zoom meeting from Brightspace.
- Schedule a meeting for a lecture in Brightspace.
- Open a web browser and go to usc.zoom.us.
- Click Sign In. You will be signed in automatically through single sign-on.
- Click the Meetings link on the left-hand side of the screen.
- Locate your meeting and click the meeting like in the Topic column.
- At the bottom of the screen, locate the message “You have not created any poll yet.” Click the Add button next to the message.
- On the Add a Poll pop-up screen:
- Add a poll title at the top of the screen.
- Enter the first question in the field containing the text “Type your question here.”
- Select whether participants can select one or multiple choices.
- Click +Add a Question to add additional poll questions.
- Once you have entered all questions, click Save.
- Start the meeting from Brightspace when it is scheduled to begin.
- To use the poll during the lecture, click

- Click Launch Polling. All class participants will be prompted to answer the poll questions. Poll results will be displayed on the instructor screen in real time.
- When the polling is complete, click End Polling.
- If you wish to send the poll results to the class participants’ screens, click Share Results.
- Close the Polls pop-up window when polling is complete.
Manage Non-Verbal Features
Both presenters and participants may use non-verbal communication in Zoom to express opinions, respond to questions, or provide status.
- Click Manage Participants.
- At the bottom of the Participants panel, all non- verbal icons appear. In addition to the labeled icons, the non-labeled icons include dislike, like, clap, need a break, and away. The number that appears next to the icon indicates the number of participants who selected that icon.
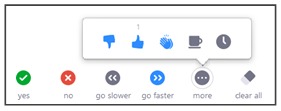
- Instructors and class participants may use these icons. When a participant uses an icon, it appears next to his/her name. This indicates a non-verbal choice or need of a participant.

- You may remove all icons next to participants’ names by clicking the clear all icon. This is a useful feature when asking using the feature to count yes/no or like/dislike responses during a lecture.
Chat Feature
Send Messages
Use Chat to communicate with participants during a class lecture in Zoom.
- Click Chat.

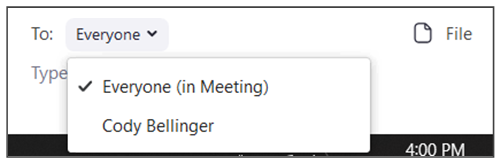
- In the Zoom Group Chat panel, select whether you will send a message to the group or an individual.
- Type your message and press Enter.
- Text may include web links and links to videos.
- Your message and participant responses will display at the top of the panel.
Save Chat
- In the Zoom Group Chat panel, click

- Click Save Chat.
- The chat is saved as a .txt file on your hard drive. To view the location of the file, click Show in Folder.
Send Files
Files will be sent to everyone in the meeting.
- In the Zoom Group Chat panel, click File.
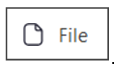
- In the pop-up window, search for a file to upload.
- Double-click the file to upload it to Chat and send it to participants.
- When the file has been sent, a confirmation message appears, and the document is displayed in the chat panel with a green check.

Screen Share
- Place your cursor on the screen.
- A bar appears at the bottom of the screen. Click Share Screen.

- Select one of the following sharing options.
- Select Screen to share all the open windows on your computer.
- Select an individual screen to share only that window. Minimized windows will not display.
- If you plan to share a video, select the checkboxes for Share Computer Sound and Optimize Screen Sharing for Video Clip.
- Click Share. You are now sharing the contents of your computer screen with all of the people who have joined your meeting.
To stop sharing, click Stop Share at the top of the screen. The meeting is still active at this point. However, you are no longer sharing your screen.

Annotation
Annotation allows you and meeting participants to annotate on a shared screen.
- Click Annotate.

- Use the tools in the annotation bar to draw, highlight, stamp, and point to items on the screen. When you select an annotation tool, your mouse is temporarily converted into that tool.

- To remove annotations, use Clear.

- To revert to the mouse as a pointer, click Mouse.

- To save an annotated screen, click Save. Then click Show in Folder to view the image file.
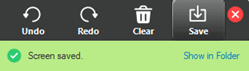
- To close the annotation board, click
the red X.

Whiteboard
The whiteboard feature allows you to share a whiteboard with participants. Everyone in the meeting may annotate a shared whiteboard.
- Click Share Screen.
- Select Whiteboard
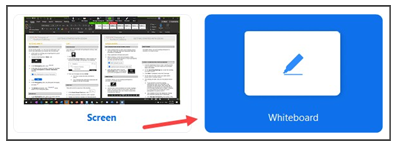
- Click Share.

- The whiteboard is activated, and the annotation tools are displayed automatically.
- All participants may annotate the whiteboard. The annotation functions are the same on the whiteboard as they are for other shared screens.
- Click Stop Share to close the whiteboard.
