There are several methods you can use to move your data from Google Drive to another location. These are listed in order of efficiency for moving large amounts of data.
-
- Microsoft Mover.io Used for Moving Drive files from Google Drive to Microsoft OneDrive Audience: All USC roles Note: Microsoft Mover does not currently support moving files directly from a Google Shared Drive to OneDrive.
- Google Transfer and Google Takeout Recommended to move Drive files and Gmail messages. Takeout is recommended for Photos or when transferring more than your personal Google account capacity. Audience: USC students and former students
- Google Drive Client with Microsoft OneDrive Sync Client (move Drive files to OneDrive) Audience: All USC roles
- Google Drive Client or Web Client (download files to local drive or network file share) Audience: All USC roles
- Outlook client or Gmail Web Client (move Gmail messages to Microsoft Exchange mailbox) Audience: All USC roles
Microsoft Mover.io
Overview
Mover.io is a web-based app that offers a free migration service for cloud storage data. The service was acquired by Microsoft and has a familiar file structure interface that makes moving content from one platform to another relatively easy.
Limitations
During the migration process, Google native files will automatically be converted to a supported file format in the destination location. However, not all of Google’s content is compatible with other cloud platforms. For example, Google Jamboard files cannot be converted nor exported to an alternative format such as PDF. In such cases, you must manually recreate the content in its equivalent under the destination platform.
Content Restrictions for UW
The following will not migrate using the Mover.io tool, either as a source or a destination for content:
-
- Google Shared Drives
- Microsoft SharePoint
How-to Video
How-to Guide
Before starting the process outlined below, be sure you are using the correct tool by following the link provided in step one. Mover.io has multiple tools available on the site, some of which are incompatible with migrating UW Microsoft 365 accounts.
-
-
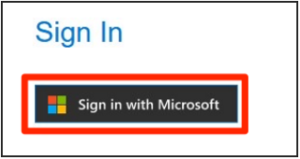
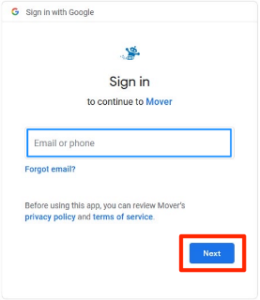
- Open the migration tool located at: https://app.mover.io/ and select “Sign in with Microsoft.”
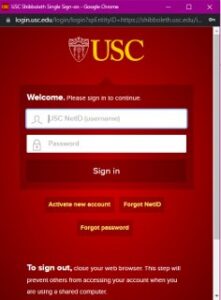
- Sign in using your @usc.edu NetID and password.
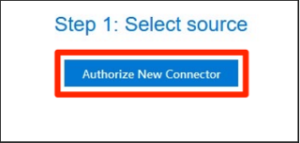
- Authorize a File Source (Google Drive) – After logging into Mover.io, select Authorize New Connector.
- Next to Google Drive (Single User), select Authorize.

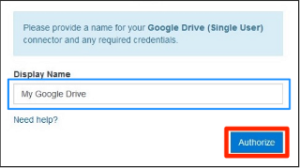
- Then, provide a name for your new Google Drive connector and select Authorize again.
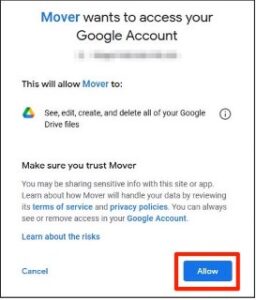
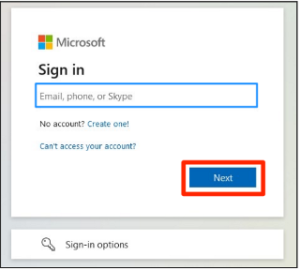
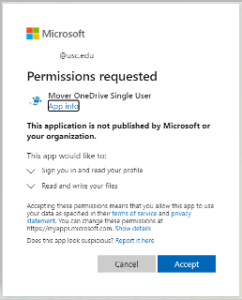
- Select the account you will be moving content from. Sign into your University Google account using your @usc.edu email address and password, and allow Mover.io to have permission to access your Google Drive.
- Log in with your USC credentials and authenticate with Duo
- Click Allow to Trust Mover
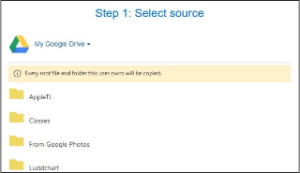
- Mover.io will then list the folders in your Google Drive. By default, Mover.io will migrate every file and folder inside Google Drive. To select only a specific folder, navigate to it in the folder listing.
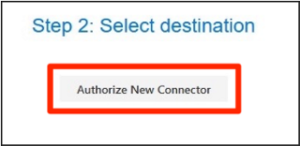
- Authorize A File Destination (OneDrive) – In the middle pane of the Mover.io app, labeled Step 2: Select Destination, and choose Authorize New Connector.
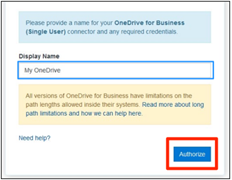
- Then, next to OneDrive for Business (Single User), select Authorize.

- Provide a name for your new OneDrive connector and select Authorize again.
- Sign into your USC Microsoft Account using your @usc.edu email address and password.
- Accept permissions.
- Mover.io will list the folders in your OneDrive. Select Create Folder, and choose a name indicating that these files came from Google Drive. Then select the folder you created to migrate files into.
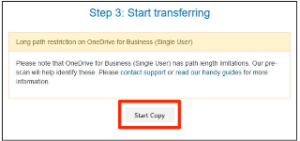
- Migrate your files – Select Start Copy in the far-right column of Mover.io, under Step 3: Start transferring to begin the migration process.
- You will then be presented with the Mover Dashboard to see successfully migrated content. Monitor the migration progress on the Mover.io page that appears. The migration will continue in the background, moving your files to OneDrive. When the transfer is complete, Mover.io will show a status of Success next to the row representing your migration.
- Mover.io will store previous migration settings if you’d like to run the migration again.
- You can start another migration by selecting Transfer Wizard near the top of the window and walking through the process again.
- Connectors will stay authorized once you connect them, so there is no need to sign in again.Note: Microsoft Mover does not support moving files directly from a Google Shared Drive to OneDrive.
back to top
Google Transfer and Google Takeout
Using Google Transfer and Google Takeout, you can migrate data from your University of Southern California NetID to move your Google account to any other Google account.
Using Google Transfer and Google Takeout allows you to:
-
- Back up your files from time to time
- Keep important files when you graduate
Google Transfer
You can copy and transfer these kinds of files from your USC Students account to another Google Account:
-
- Email in Gmail (not contacts, chats, or tasks)
- Documents that you own in Google Drive (except files in the “Google Photos” section of Drive)
- Documents in My Drive
Your original files will stay in your school account until it is disabled one year after separation. Any changes you make to the copied files in your non-USC Google Account do not affect the original files in your USC Google Drive.
Please note that if files in your Google Drive match either (or both) of these conditions, they will not be copied.
-
- You are a viewer, not an editor or owner
- The owner has turned off the download, print, and copy options
How-to Video
Copy & transfer your files
Each time you copy files from your school account, a new set of copies is created in your Google Account.
Prepare your files
To copy content that other people have shared with you, follow the directions here to add those files to My Drive.
Start the copy process
-
-
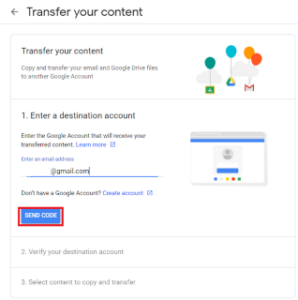
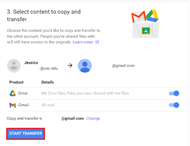
- On your school account, go to https://takeout.google.com/transfer
- Enter the email address of the Google Account where you want to copy your content.
- Select Send code.
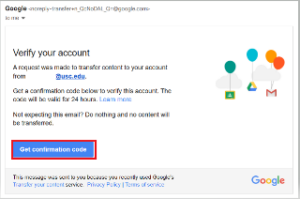
- On your Google Account, check your Gmail inbox for a confirmation email from Google. In the email, select Get confirmation code. A new tab will open with a code.
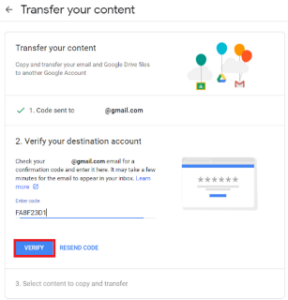
- On your school account, go back to the “Transfer your content” page. Enter the code, then choose Verify.
- Choose the content you’d like to copy, then select Start transfer.
Details about the copy process
-
- The copy process usually happens within a few hours, but it can take up to a week.
- Copied files might appear in batches on your Google Account during the copy process.
- When your files are finished copying, you’ll get an email at your Gmail address.
See your copied files.
To see the files you’ve copied, sign in to Gmail or Google Drive with your Google Account.
-
- Gmail: Copied content will be labeled with your school account name and the date you started the copy process.
- Drive: Copied content will be in a folder labeled with your school account name and the date you started the copy process.
What changes on copied files?
There are a few important changes that happen on files copied from Google Drive:
-
- You automatically become the file owner of all copied files. (The owners of the original files remain the same.)
- Copied files aren’t shared with others. (You can always choose to share them.)
- Comments are copied, but revision history isn’t.
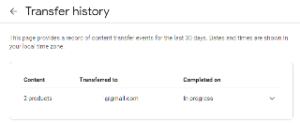
View transfer history
To see details about the content you’ve copied in the past 30 days:
-
-
- Go to Transfer your content.
- Select Manage transfer history.
back to top
Google Takeout
Using Google Takeout, you can export and download your data from the Google products you use, like your email, calendar, and photos. In a few easy steps, create an archive to keep for your records or use the data in another service.
Note: Downloading your data does not delete it from Google’s servers.
How-to Video
First, choose which products to include.
-
-
- Visit the Google Takeout page. You might have to sign in to your Google Account.
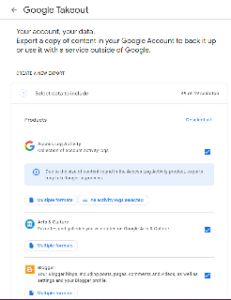
- Choose which Google products to include in your download. To see more details and options for a product, select the down arrow.
- Select Next.
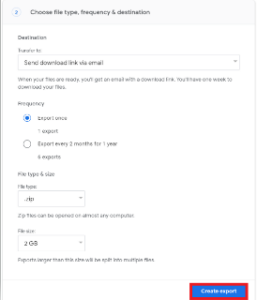
- Choose your archive’s File type. Usually, ZIP is the best format to choose.
Note: If you have Google Play Music data in your account, your content isn’t included when you create an archive.
Next, choose how your archive is delivered
-
-
- For “Delivery method,” select Send download link via email.
- Choose Create export button.
- In the email that arrives, click Download archive.

- To download your data, follow the onscreen instructions.
When your archive is created, we’ll email you a link to its location. Depending on the amount of information in your account, this process could take a few minutes or several hours. Most people get the link to their archive the same day they request it.
back to top
Google Drive Client with Microsoft OneDrive Sync Client (move Drive files to OneDrive)
All the USC roles can also move their G Suite Drive files to Microsoft 365, OneDrive.
How-to Video
Information Technology encourages students, faculty, and staff to migrate data from Google Drive to OneDrive using the following steps:
-
-
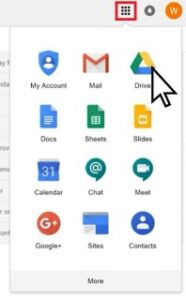
- Sign in to your Gmail account, click the Google Apps icon in the upper-right corner, and choose Drive.
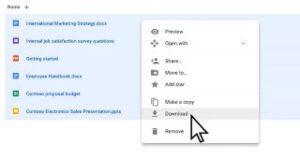
- In Drive, select all your documents, right-click, and choose Download.
- After your files have been compressed into a downloadable .zip file, choose Save at the bottom of your screen and save the .zip file to your desktop.

- Configure your OneDrive account if you don’t have one already configured.
- On your Windows desktop, click the OneDrive cloud icon in the System Tray (located in the Windows Task Bar), and choose Settings on the menu.
- In the Microsoft OneDrive dialog box, choose Add an account, and then sign in with your Microsoft 365 email address and password.
- Follow the steps in the setup wizard, and then choose Open my OneDrive folder.
- From your desktop, open the .zip file you downloaded from Google Drive, select all the files, and drag them to your OneDrive folder.
- The files will start uploading and syncing to OneDrive for Business, as green check marks indicate.
back to top
Google Drive Client or Web Client (Download files to a local drive or network file share)
Audience: All USC roles
How-to Video
Information Technology Services encourages students, faculty, and staff to Download files from Google Drive to a local drive or network file share using the following steps:
-
-
- Go to drive.google.com.
- Click a file to download.
- To download multiple files, press Command (Mac) or Ctrl (Windows) -> click any other files.
- Right-click -> click Download.
Tips:
-
- You can’t drag a file or folder directly to your desktop.
-
- If you can’t download a file, the owner may have disabled options to print, download, or copy for people with only comment or view access.
back to top
Outlook client or Gmail Web Client (move Gmail messages to Microsoft Exchange mailbox)
Audience: All USC roles, as students, faculty, and staff, can Import Gmail to Outlook using the following steps:
Import Gmail to Outlook
When you switch to Microsoft 365 email from another service, such as Gmail, you have two options:
-
- Import a copy of your old email into your Microsoft 365 account. This way, you can have all your email—past and present—in one account. Choose this option if you have the Outlook app (2013 or 2016) installed on your computer and plan to retire your Gmail account. Instructions are provided here.
OR
-
- Connect your old email account to Outlook. You can see and access your old email, but it will be stored in your Gmail account, not your Microsoft 365 account. Choose this option if you plan to keep your Gmail account active or don’t have the Outlook app installed on your computer. For the steps, see Connect email accounts in Outlook on the web (Office 365).
back to top


