Intro to Zoom
Zoom provides a high-quality, mobile-optimized, video and audio conferencing service for free to all USC students.
- If you do not have a USC Zoom account yet, follow the instructions below.
- If you do have an existing Zoom account through a USC school, administrative unit or 2U- administered on-line Master’s program, please read our Note on Existing Zoom Accounts.
Familiarize Yourself with Zoom
The quick reference guides below will provide you with a quick overview on the following Zoom topics:
Student Access to Zoom via Blackboard
It is strongly recommended that you use a computer to access Blackboard and Zoom meetings for online classes. Using a phone is not recommended.
Install Zoom
To use Zoom with Blackboard, you must have the Zoom app installed on your computer.
- In your web browser, go to: https://zoom.us/support/download
- A file called ZoomInstaller.exe will automatically download to your computer. Most end users will see the file appear in the bottom left-hand corner of the screen. Click the filename to begin the installation.

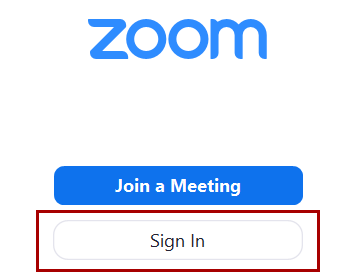
- A Zoom Meetings window appears when the installation is complete. Click Sign In.
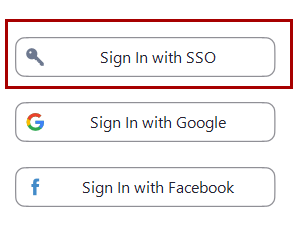
- Click Sign In with SSO.
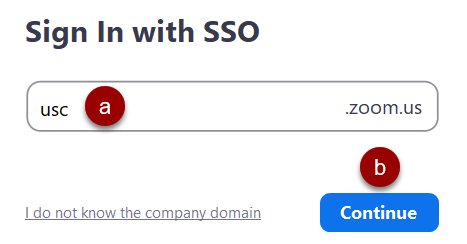
- Input “usc” in the Company Domain field.

- Click Continue.
- Click Open Zoom Meetings.
- The Zoom app installation is complete.
Join a Zoom Meeting from Blackboard
Log into Blackboard to access a scheduled Zoom meeting. It is recommended that you access Blackboard and Zoom at least 5 minutes before the course is scheduled to begin.
- Ensure that your headset is plugged into your computer and the volume is not muted.
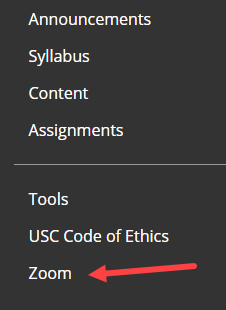
- Log into Blackboard.
- Navigate to your course under My Courses.
- In the menu on the left-hand side of the screen, click the link that contains the word “Zoom.”
- In the Upcoming Meetings tab, locate the course session that you wish to join.
- Click
 . A new browser window will open.
 - Click

- The Zoom app will launch.
- If the meeting has started, you will automatically enter the online session.
- If the meeting has not yet started, you will see a pop-up window with the message “Please wait for the host to start this meeting.”
- One the meeting begins, ensure that your microphone is on mute.
- Once you are in the meeting, your name will be displayed in the participants list, and you may use chat, screen sharing, and other features
- To leave the meeting, click Leave Meeting.
Join Zoom Meeting Via SSO
Use these instructions to join a Zoom meeting after logging in via SSO.
- Locate the Zoom app
 on your computer and click to open.
2. Click Sign In.
- Click Sign In with SSO.
- On the Sign In with SSO screen:
- (a) Input “usc” in the Company Domain
- (b) Click Continue.
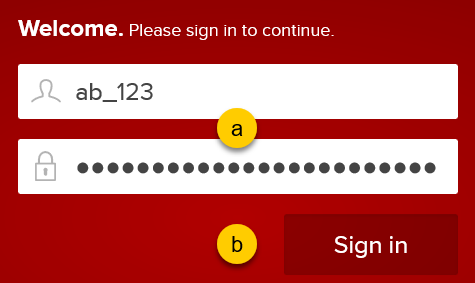
- On the Welcome screen:
- (a) Enter your Net ID and password.
- (b) Click Sign in.
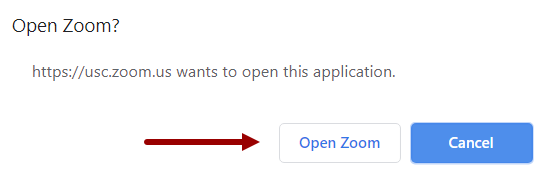
- A browser window opens. Click Open Zoom.
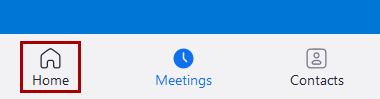
- The Zoom app opens. Click Home.
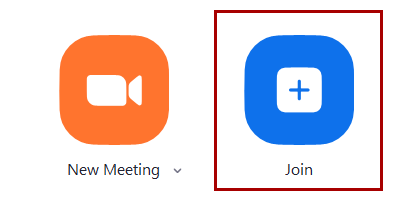
- Click Join.
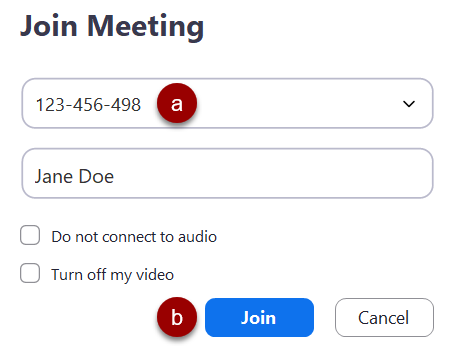
- On the Join Meeting screen:
- (a) Enter the meeting ID. You will find this in the invitation or e-mail from the host.
- (b) Click Join.
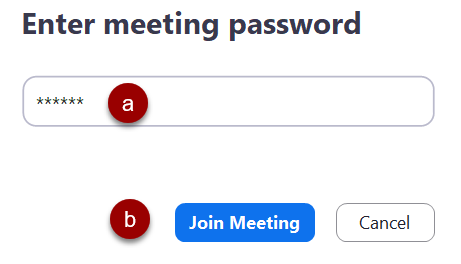
- If prompted:
- (a) Enter a meeting password. You will find this in the invitation or e-mail from the host, usually below the meeting number.
- (b) Click Join Meeting.
- Wait for the meeting to start and for the host to admit you into the meeting from a waiting room. This task is complete.
Join Zoom Meeting Via Voice
- Open the meeting invite in Outlook.
- Scroll to the Join by Telephone section. [Example image below.]

- Call the number listed after “US:.”
- Enter the Meeting ID found next to “Meeting ID:”
Note: All dial in participants will be placed in the Waiting Room for the host to admit.
Adding a Profile Picture to Zoom
Follow these steps to add a profile picture to Zoom:
- In your web browser, go to https://usc.zoom.us/.
- Click
 .
. - If prompted, click on the USC single sign-on page
 .
. - On the Zoom Profile tab, click Change under the profile icon.

- On the Change Picture screen, click
 .
. - Locate and double-click the image file on your computer.
- On the Change Picture screen, use the cropping tool to resize and move the portion of the image that will be used for your profile.
- Click
 .
. - The picture is saved to your profile and will appear next to your name in the Participants panel in Zoom meetings.
Start and Stop Video in Zoom
Hosts and participants in Zoom meetings can start and stop video on their computer camera. You may also add a virtual background when your video is active.
Start Video:
- Place your mouse in the meeting window.
- A bar will appear with several icons. Locate and click
 in the bottom left.
 - Your video camera will be active. Adjust the camera angle to ensure that you appear on the screen.
Stop Video:
- To stop your video, place your mouse in the meeting window.
- Click
 . Your computer’s camera will be deactivated.
Virtual Background:
For many end users of Zoom, it may be convenient to replace the background from their home office with a virtual background. The virtual background will cover up your actual background.
- In your web browser, go to https://usc.zoom.us/.
- Click Settings.
- Under Meeting, click In Meeting (Advanced).
- Scroll down to Virtual Background and turn the option on.

- In the Zoom app, turn on your video.
- Select
 and then Choose Virtual Background.
- On the Settings screen:
- Click to select a background, or
- Click
 to upload your own background image
- Close the Settings screen by clicking
 in the upper right-hand corner. Your old background will now be replaced with the new background. This will be the default for future meetings.
How do I know if I am logged into Zoom
Open the Zoom client.
- Click your profile picture in the top-right corner.
- Click Sign Out.
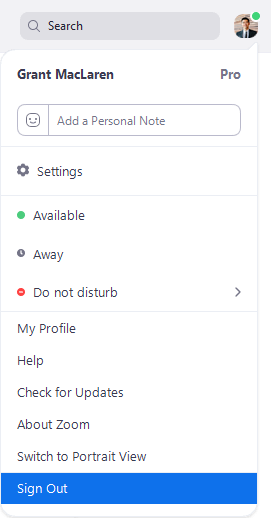
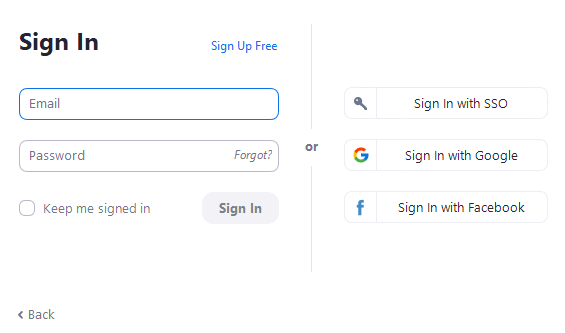
- Click Sign In.
Sign in to your desired account using your USC email. You should also be prompted to sign in using SSO.
How often should I log into Zoom?
- USC Zoom Inactivity timers are set such that
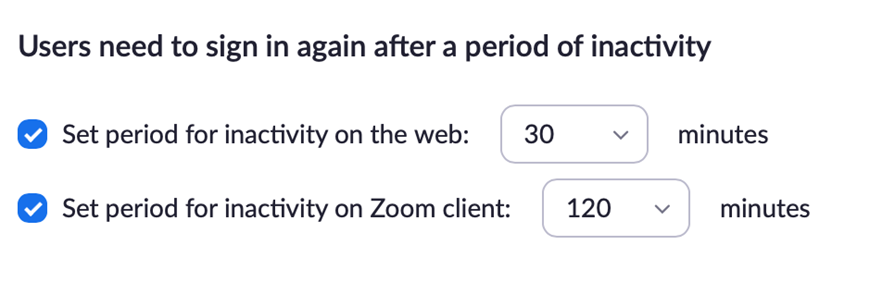
- Shibboleth enforces session time out is 8 hours regardless of activity.
Zoom’s Limitations
Zoom is arguably one of the best web conferencing platforms available. But it was designed more for live, one-off meetings than for recurring classes or lectures. Some of the things that you might want to do in a teaching platform like Adobe Connect, Blackboard or Canvas you simply won’t be able to do in Zoom.
For example:
- Student notetaking: Unless your students have large screens or external monitors, taking notes during a Zoom meeting requires that they frequently switch back and forth between Zoom and whatever program they use to take notes. There is no other workaround other than the students connecting to the Zoom meeting on a device separate from the one the students will be using to take notes.
- Pre-loading content: In a traditional learning management system like Blackboard, you can access your course site before the semester begins, change the site’s layout and appearance, upload documents and assignments, and more. You cannot do any of those things in Zoom. Zoom is simply a live web conferencing platform that lets you share your web camera and screen with others.
- Testing/Exams: While Zoom has a polling tool, it does not have a testing or exam tool. If you want to give your students a graded assessment, you will need to use an external tool like Blackboard.
- Attendance Reporting: Zoom can create a report showing who attended a particular Zoom meeting, but that report is hidden. Go to https://usc.zoom.us/account/my/report, search for a meeting within a one-month window, and then click on that meeting’s number of participants in the “Participants” column.
- Breakout Rooms: Zoom offers breakout rooms (see above for instructions on how to enable them) and you can either create them and assign students to them live during class or you can pre-assign participants to breakout rooms before class begins. Unfortunately, there is no way to pre-populate your breakout rooms with content or instructions before class begins. In addition, when your class meeting ends the breakout rooms that you create in Zoom disappear and will not appear in your next class meeting. Unfortunately, we are not aware of any workaround.
- File-Sharing: While you can share files using the Chat box, Zoom meetings are not really meant to be file repositories. The largest file you can share is 512 MB. Tip: If you want to create a file repository for your course, use Blackboard or SharePoint.
- Polling: If a poll contains multiple questions, your students must answer all of the questions and then click submit before Zoom will record any of the students’ answers. In addition, only single choice or multiple-choice questions are allowed. Tip: for more advanced polling features, use Qualtrics or Poll Everywhere.
- Whiteboarding: Zoom’s Whiteboard (see Sharing a Whiteboard) is an effective tool for summarizing key points during discussions, but the button students click to download a screenshot of the whiteboard is hidden. While the whiteboard is on the screen, the students have to click the View Options pull-down list at the top of the whiteboard and then click Annotate. Only then will they see a Save button
Other links that might be useful