Familiarize Yourself with Zoom
Set Up & Manage Zoom Meetings
Best Practices For Securing Your Zoom Meeting
Use these best practices to prevent Zoombombings and to ensure your meeting is secure.
Only Allow Registered or Domain Verified Users
Zoom can also give you peace of mind by letting you know exactly who will be attending your meeting. When scheduling a meeting, you can require attendees to register with their e-mail, name, and custom questions. You can even customize your registration page with a banner and logo. By default, Zoom also restricts participants to those who are logged into Zoom. At USC, Zooms are automatically restricted to Zoom users who’s email address uses the USC domain.
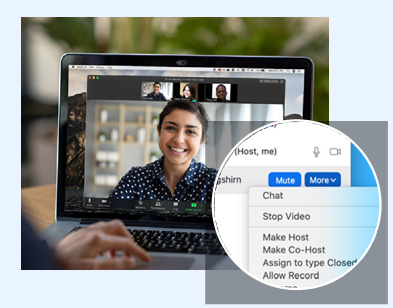
Make Someone a Co-Host
In a given meeting, hosts are the only ones with total control over a meeting. But what if you need a helping hand to manage all of your participants? You can promote a trusted meeting attendee (e.g. guest lecturer, teaching assistant) to Co-Host, allowing them many of the same privileges and control features available to the meeting host themselves. To learn about the difference between a host and a co-host, view this support article.
Additional Help and Support
Zoom Help Center
Whether you’re looking for technical documentation or a one minute quick start video, the Zoom Help Center has you covered with thousands of
resources that are updated daily, so you can get your questions answered and keep Zooming.
Live/Recorded Trainings
Our Zoom experts host free and interactive live training webinars daily. Get up to speed on important topics in less than an hour. Just select the time zone that fits best for you when registering for one of our live training webinars.
View Live Trainings & Recordings
Zoom Blog
Want to stay up-to-date on everything happening in the Zoom community?
The Zoom blog offers daily stories on what’s new at Zoom, exciting updates, and innovative customer stories and use cases to keep you inspired and on the cutting edge.
Keep Zoom Up To Date
Why is Zoom moving to a quarterly minimum version schedule?
As a best practice, customers should always be on the latest version of any software they are using as each release includes important feature updates, enhancements, and bug fixes. We understand that it isn’t always possible for organizations to update all employees and need additional time for software reviews. With this in mind, we are updating the minimum client version every 3 months. We will provide 90-days notice for the next minimum version requirements.
Which Zoom Room Devices will be required to be updated by November 5, 2022?
All devices (Mac, Windows, and Android) running Zoom Rooms software will be required to be updated by November 5, 2022. This includes devices running Zoom Room Controller software, such as the Zoom Room controller and Scheduling Displays.
Will I be able to use Zoom Chat, Zoom Phone, Zoom Meetings, Zoom Webinars, etc. when using an unsupported version after the enforcement date?
On the date of each new enforcement, users on a client below the minimum version will be signed-out of their client. You must update to the minimum version or higher before you are able to sign in to your Zoom account again and regain full access Zoom features.
What happens when users are approaching the minimum version and do not update in time?
Users will be prompted to update the Zoom meeting client to the current minimum version before signing in or joining a meeting/webinar. If unable to immediately update, users will have the option to join a meeting through the web client instead. Users will only receive a notification if the Zoom client is below the minimum version.
If users have prompts disabled at the device level, the administrator will be responsible for applying updates. For other products, such as the Zoom Scheduler extensions for Chrome and Firefox or the Zoom Room Scheduler, the scheduling functionality will be disabled and a warning will be displayed.
Do I have the ability to choose which Zoom version I would like to be on?
No, Zoom only provides the latest version through the client and our website.
How do I know if I am logged into Zoom
Open the Zoom client.
- Click your profile picture in the top-right corner.
- Click Sign Out.
- Click Sign In.
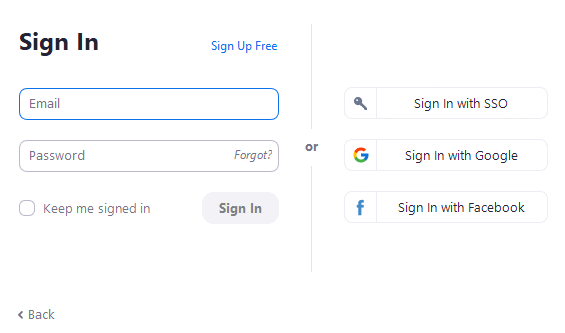
Sign in to your desired account using your USC email. You should also be prompted to sign in using SSO.
How often should I log into Zoom?
- USC Zoom Inactivity timers are set such that
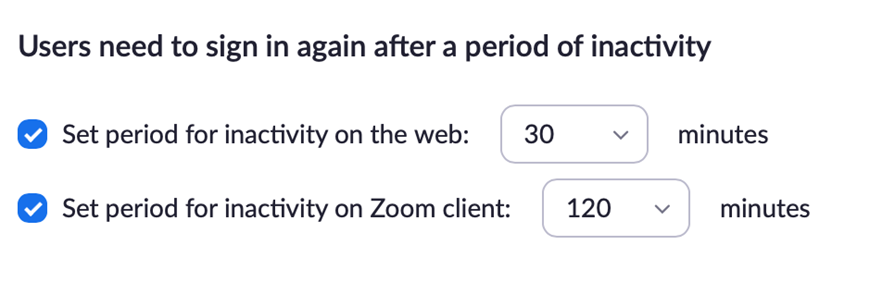
- Shibboleth enforces session time out is 8 hours regardless of activity.
Zoom Recording & Transcription Service
Enable Audio Transcript
To enable the Audio Transcript feature for your own use:
- Sign into the Zoom web portal and navigate to My Meeting Settings.
- Navigate to the Cloud recording option on the Recording tab and verify that the setting is enabled.
Notes:- If the setting is disabled, click the Status toggle to enable it. If a verification dialog displays, choose Turn Onto verify the change.
- If the option is grayed out, it has been locked at either the Group or Account level, and you will need to contact your Zoom administrator.
- In the Advanced cloud recording settings, click the Audio Transcript checkbox to enable it, then click Save to confirm the change.
Generating a Transcript
- Start a meeting or webinar.
- Click the Record button and choose Record to the Cloud.
- After the meeting ends, you will receive an email that lets you know that your cloud recording is available. A short time later, you also receive a separate email letting you know that the audio transcript for the recording is available. These emails include links to view your recordings and transcript.
Viewing and Editing the Transcript
- Click the link in the email OR navigate to the My Recordings page on the Zoom web portal and click the name of the recorded meeting.
Notes:- This opens the Recording Details page, which includes at least two files:
- Audio Only (m4a)
- Transcript Recording (vtt)
- If you selected other files for the cloud recording, these will also be included:
- Recording (mp4)
- Gallery view (mp4)
- Chat text (txt)
- This opens the Recording Details page, which includes at least two files:
- Click the Audio Only m4a file, or the Recording or Gallery View mp4 file, if available. The text of the transcript displays on the right-hand side of the file.
- Navigate to the Audio Transcript panel on the right and click the pencil icon next to the phrase you want to edit.
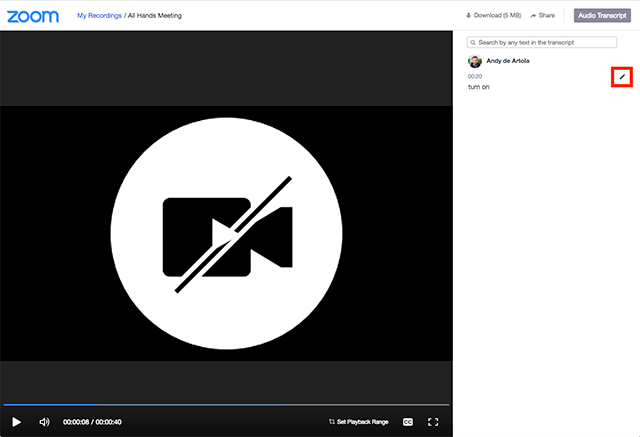
- Make any changes to the text, then click Save.
The updated version of the text is displayed when you play the audio or video file.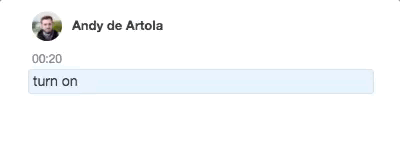
Embedding the Transcript
The transcript is automatically embedded within the audio and video file, but is hidden by default. To see the transcript embedded in the audio or video file:
- Open the audio or video file from My Recordings.
- Click the Play
- Click the CC icon at the bottom right of the screen.
Note: The text displays on top of the video, similar to closed captioning.
Searching within the Transcript
- Go to My Recordings.
- In the Search by list, choose Keyword.
- Type a word or phrase in the text entry box, then click Search.
Note:This shows the list of meetings that includes the keyword in the transcript. - Click the applicable meeting to view the transcript.
- Click the Audio Only m4a file, or the Recording or Gallery View mp4 file, if available. The text of the transcript displays on the right-hand side of the file.
- Navigate to the Audio Transcript panel on the right and type the keyword into the search box at the top. All instances of the keyword are highlighted.
Zoom Public Meetings
There are two Zoom Public Meeting options: 1) Zoom Webinar and 2) Zoom Meeting. The matrix below provides a high level overview of these options and here is side-by-side comparison to determine the Zoom session that best aligns with your Public Event. Whether you use a Zoom Webinar or Zoom Meeting, there are recommended security settings when conducting a public meeting with Zoom.
What is a Zoom Webinar?
Zoom Webinars are for view-only attendees. They start at a capacity of 100 participants and scale up to 1,000 participants. As the host or a panelist, you can share your screen, video and audio in a webinar and attendees can use the chat or question and answer options to interact with the host and panelists. Webinars can require preregistration, with the option for the host to add custom registration questions, or registration can be turned off for attendees to join by simply clicking a link at the time of the webinar. Webinars can be held once, can reoccur in a series, or can be the same session held multiple times.
How Do I Get a Zoom Webinar License?
ITS has Webinar licenses available upon request.
How Do I Keep My Zoom Meetings Secure?
There are recommended security settings when conducting a public meeting with Zoom.
Using Zoom
Best Practices
Meeting Preparation for Hosts
Before the meeting
- Schedule Zoom meetings in Outlook to ensure that invitees have the meeting link in their calendars.
- Send materials to participants via e-mail in advance.
- If your presentation is large, visually dense, or contains video, consider loading it to Google Drive or other cloud-based storage. Then share the link with participants.
- Be prepared to follow good meeting practices: Sending an agenda in advance, identify the facilitator, timekeeper, and note taker.
Your remote meeting room
- Find a quite space for your call and ensure the lighting works well with your camera.
- When connecting from a laptop, keep the power supply plugged in.
- Use a headset with a microphone instead of your computer microphone and speakers.
- Ensure your presentation is ready to be shared.
Communication
Starting the meeting (Host)
- Hosts should start the meeting a few minutes early, leaving time to resolve any issues.
- Ensure that everyone has their video on to improve the interactive experience.
- Once all participants have joined, ensure everyone can hear you.
- Be prepared to use the Zoom chat function for anyone with audio or video issues.
- If needed, make introductions to break the ice and ensure everyone can hear each other.
- Ask all participants to go on mute if they are not speaking.
- If you plan to record the meeting, notify all participants at the beginning of the meeting.
During the meeting (All Participants)
- Speak clearly and in a normal voice and avoid shuffling papers or making other noises.
- State your name before asking a question or commenting to identify who is speaking.
- Use public chat for group questions and private chat for side conversations.
- Tell others if you leave the video conference early.
- Maintain eye contact and avoid quick movements while speaking.
- Use the “Raise Hand” function to if you have a question. This helps to avoid interruptions and activation of the Zoom switching feature which moves the camera to the active speaker.
- Make it safe to call out participants on poor meeting etiquette.
After the meeting (Host)
- Send meeting minutes to participants.
- If scheduling a follow-up meeting, send the invitation out as soon as possible.
Join Zoom Meeting Via SSO
Use these instructions to join a Zoom meeting after logging in via SSO.
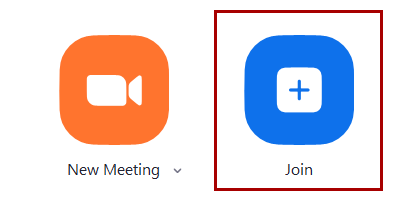
- Locate the Zoom app
 on your computer and click to open.
2. Click Sign In.
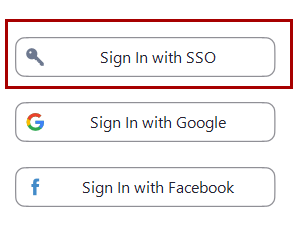
- Click Sign In with SSO.
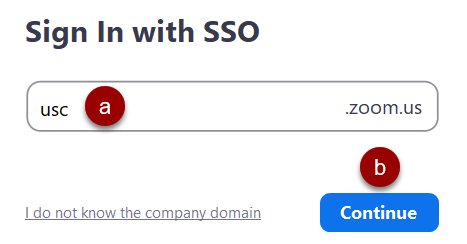
- On the Sign In with SSO screen:
- (a) Input “usc” in the Company Domain
- (b) Click Continue.
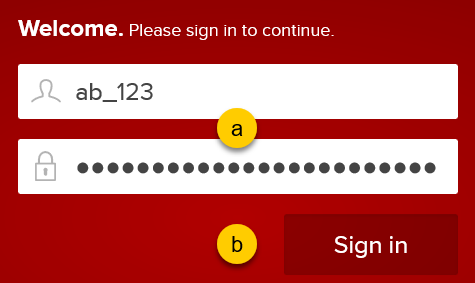
- On the Welcome screen:
- (a) Enter your Net ID and password.
- (b) Click Sign in.
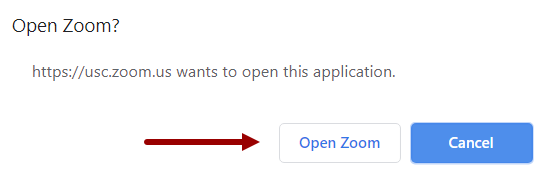
- A browser window opens. Click Open Zoom.
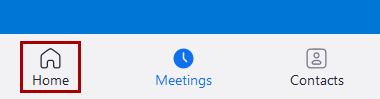
- The Zoom app opens. Click Home.
- Click Join.
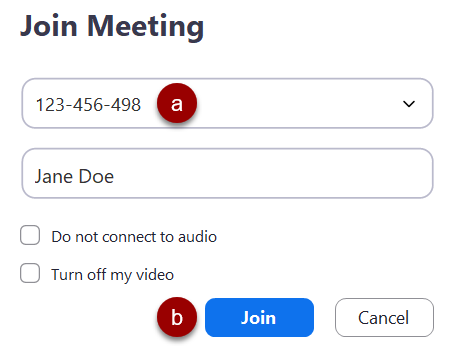
- On the Join Meeting screen:
- (a) Enter the meeting ID. You will find this in the invitation or e-mail from the host.
- (b) Click Join.
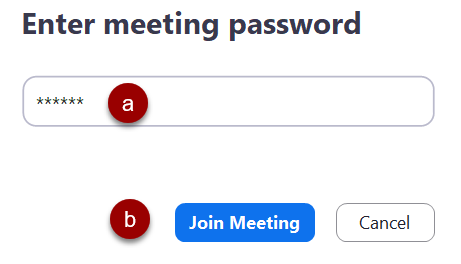
- If prompted:
- (a) Enter a meeting password. You will find this in the invitation or e-mail from the host, usually below the meeting number.
- (b) Click Join Meeting.
- Wait for the meeting to start and for the host to admit you into the meeting from a waiting room. This task is complete.
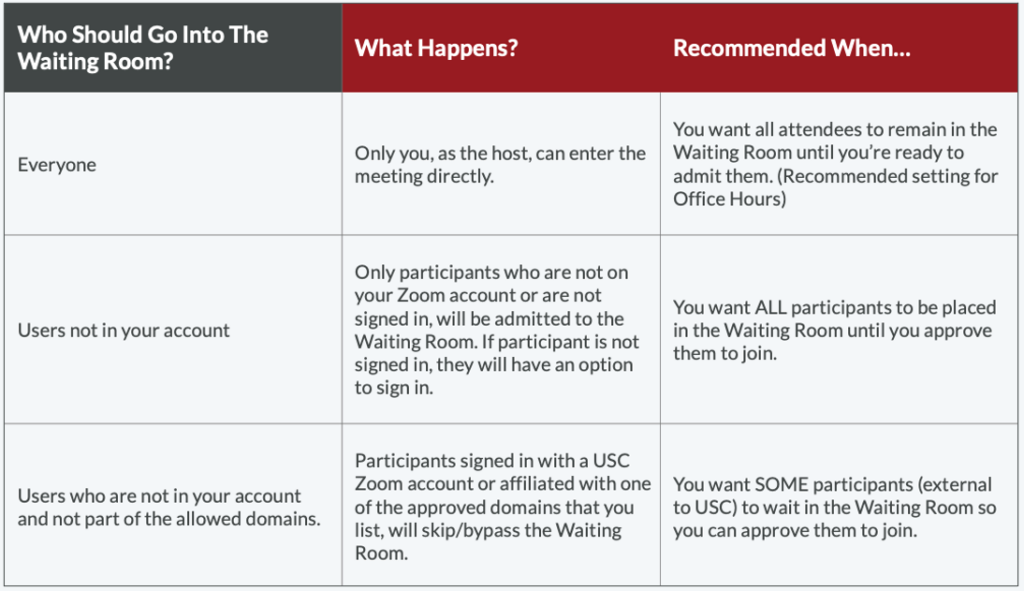
USC Waiting Room Options
Who should go in the Waiting Room?
USC Zoom offers you a choice of three options. Everyone, Users not in your account, and Users who are not in your account and not part of the allowed domains.
IMPORTANT REMINDER: When you pick an option, it will override all your Zoom Waiting Room settings for all meetings until you change your Waiting Room settings.
USC ITS has submitted a “feature request” to Zoom to develop a more streamlined approach for office hours as part of the Zoom education platform offering.
For Faculty Zoom Office Hours:
- Before each Zoom Office Hours: Please set your meeting to place everyone in the Waiting Room.
- After each Zoom Office Hours: Please set your Zoom Waiting Room to place users who are not in your account and not part of the allowed domains, to be placed in the Waiting Room.
Here’s how to choose.
- Click here to see step-by-step instructions on how to place EVERYONE in the ZOOM WAITING ROOM.
- Click here to see step-by-step instructions on how to BYPASS the ZOOM WAITING ROOM.
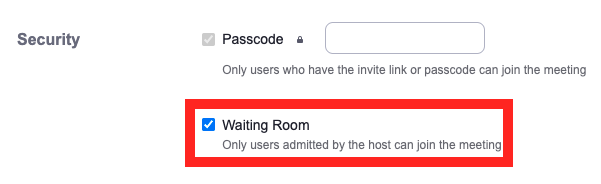
Enable Waiting Room for a Specific Meeting
To implement this security feature when scheduling a new meeting, follow these steps.
- Schedule a new Zoom meeting.
- Under “Security,” check the box Waiting Room.
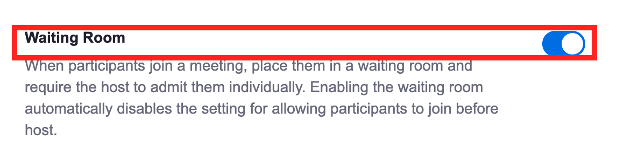
Turn Waiting Room ON By Default
To send participants to a Waiting Room by default, follow these steps.
- Sign in to the Zoom Web Portal at usc.zoom.us to access your profile page.
- Click Settings on the left navigation bar and then select Security.
- Find the setting labeled Waiting Room and toggle the switch on.
- Save your meeting.
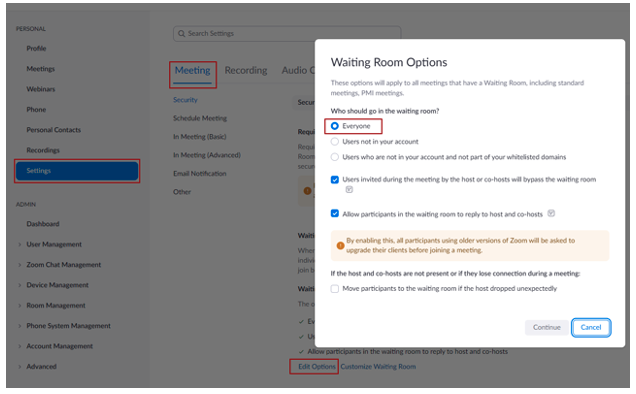
Edit “Who should go into the waiting room?”
The option you choose will apply to all of your meetings when ‘Waiting Room’ is enabled. To edit ‘Who will go into the waiting room?’, follow these steps:
- Sign in to the Zoom Web Portal at usc.zoom.us to access your profile page.
- Click Settings on the left navigation bar and then select Security.
- Find the setting labeled Waiting Room and make sure the waiting room is on.
- Click the Edit Options link.
Place Everyone in Waiting Room (Best setting for Office Hours).
- Select Everyone, then Continue.
- Click here to see step-by-step instructions on how to place EVERYONE in the ZOOM WAITING ROOM.
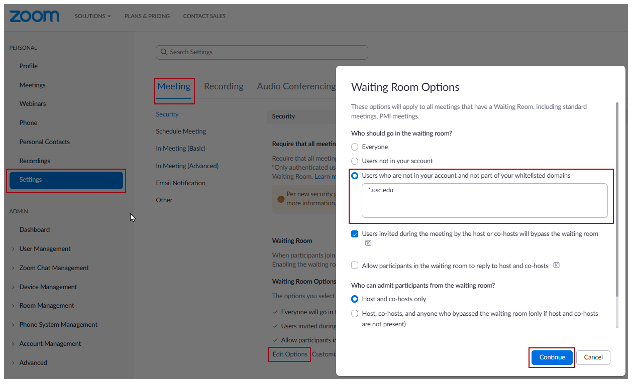
Set Waiting Room where @usc.edu zoom users can bypass the Waiting Room. (Best setting for meetings and online courses).
- Select Users who are not in your account and not part of your whitelisted domains.
- Make sure *.usc.edu is populated in the text area.
- Click Continue.
- Click here to see step-by-step instructions on how to BYPASS the ZOOM WAITING ROOM.
Join Zoom Meeting Via Voice
- Open the meeting invite in Outlook.
- Scroll to the Join by Telephone section. [Example image below.]
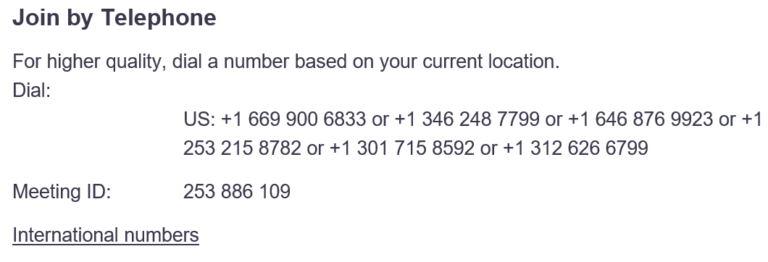
- Call the number listed after “US:.”
- Enter the Meeting ID found next to “Meeting ID:”
Note: All dial in participants will be placed in the Waiting Room for the host to admit.
Adding a Profile Picture to Zoom
Follow these steps to add a profile picture to Zoom:
- In your web browser, go to https://usc.zoom.us/.
- Click
 .
. - If prompted, click on the USC single sign-on page
 .
. - On the Zoom Profile tab, click Change under the profile icon.

- On the Change Picture screen, click
 .
. - Locate and double-click the image file on your computer.
- On the Change Picture screen, use the cropping tool to resize and move the portion of the image that will be used for your profile.
- Click
 .
. - The picture is saved to your profile and will appear next to your name in the Participants panel in Zoom meetings.
Start and Stop Video in Zoom
Hosts and participants in Zoom meetings can start and stop video on their computer camera. You may also add a virtual background when your video is active.
Start Video:
- Place your mouse in the meeting window.
- A bar will appear with several icons. Locate and click
 in the bottom left.
 - Your video camera will be active. Adjust the camera angle to ensure that you appear on the screen.
Stop Video:
- To stop your video, place your mouse in the meeting window.
- Click
 . Your computer’s camera will be deactivated.
Virtual Background:
For many end users of Zoom, it may be convenient to replace the background from their home office with a virtual background. The virtual background will cover up your actual background.
- In your web browser, go to https://usc.zoom.us/.
- Click Settings.
- Under Meeting, click In Meeting (Advanced).
- Scroll down to Virtual Background and turn the option on.

- In the Zoom app, turn on your video.
- Select
 and then Choose Virtual Background.
- On the Settings screen:
- Click to select a background, or
- Click
 to upload your own background image
- Close the Settings screen by clicking
 in the upper right-hand corner. Your old background will now be replaced with the new background. This will be the default for future meetings.
USC Zoom Backgrounds
The backgrounds below have been created by the university to be added to Zoom:
Black Backgrounds
Gold Backgrounds
Cardinal Backgrounds
Grey Backgrounds
Live Transcription Service (Beta)
Client requirements:
The Live transcription feature has been confirmed to work with the following Zoom clients:
- Zoom Desktop Applications for Windows and macOS
- Zoom Mobile Applications for iOS and Android
Note: Live transcriptions cannot be accessed using the web client (browser) regardless of type.
Enabling within Zoom Meeting using the Zoom Desktop application:
- Click the Live Transcript button in the bottom of your Zoom meeting window.
- Select Enable Auto-Transcription.
- Note: to disable auto-transcription, just click the Live Transcript button once again, and select, Disable Auto-Transcription.
Enabling live transcriptions within Zoom Meeting using the Zoom mobile application:
Note: The following steps and images are for iOS.
- In the Zoom meeting click the More button located in the in meeting control bar.
- Select, Enable Live Transcripts.
In Meeting Controls:
Displaying Live Transcripts in the Zoom Desktop App
- As the Host: Click the ^ (caret) key to the upper right of the Live Transcript button within your Zoom meeting.
- As a Participant: Click the Live Transcript button within your Zoom meeting.
- Select View Full Transcript.
- The meeting’s audio will be transcribed into a window in the far right of the Zoom desktop app.
Saving the Full Transcript:
- The meeting’s transcript can be save as a .txt file.
- At the bottom of the full transcription window, select Save Transcript.
Check back for additional screen shots and instructions will be added to keep teaching and Service desk KB articles.
Other links that might be useful