Lorem ipsum dolor sit amet, consectetur adipiscing elit. Quisque quis massa magna. Nulla ac nunc eu augue hendrerit interdum non quis mi. Nam pharetra nec augue vitae suscipit. Nulla malesuada orci ut neque dictum, a semper elit laoreet.
Getting Started with Labster Simulations
Labster Quick Access
How to Share Quick Access with Your Students
Labster Quick Access is designed to be fast and easy to get setup. No classroom setup needed, and no login required before accessing a specific simulation.
As an instructor, you can simply share your Quick Access link with your students — either by email or by posting it online in your LMS/communication boards.
Students will be asked to log in (via Google, Facebook, or by registering) once they have selected a simulation to play. They will have unlimited free access to the simulations thereafter, and can play the same simulations as many times as they like.
Sharing Specific Simulations with Your Students
If you want to share a specific simulation with your students via email or your class messaging board (outside Labster), you can simply:
- Select the simulation in your Quick Access simulation list/page
- Right click the Play Simulation button, and select “Copy Link” (or similar)
- Share this link to a specific simulation with your students e.g. via email

Grades and Teacher Dashboard
The quick access solution is built to provide instant fast setup, without any LMS integrations required. Therefore there is no access to student grades/teacher dashboards with the Quick Access solution.
For access to student grades, please see the below instructions on how to download simulations and add to Blackboard.
How to Downlod Labster Simulations
To add Labster simulations to your Blackboard course, you will first need to download the simulations in a common cartridge .zip file from the Faculty Resources page. Please see the following video for download instructions.
Add A Labster Simulation to Your Blackboard Course
Step 1: Import the Common Cartridge file to your course

- Log in to Blackboard and navigate to your course
- Go to Course Management > Packages and Utilities > Import Package / View Logs
- Select Import Package button
- Select a Package : select the .zip file from Labster
- Under the Select Course Materials section, select the Content Areas checkbox
- Press Submit
- After a few seconds, refresh the page. The imported simulations will be found under the newly created Labster Simulations menu, in the left-hand side panel
Step 2: Update the simulation settings
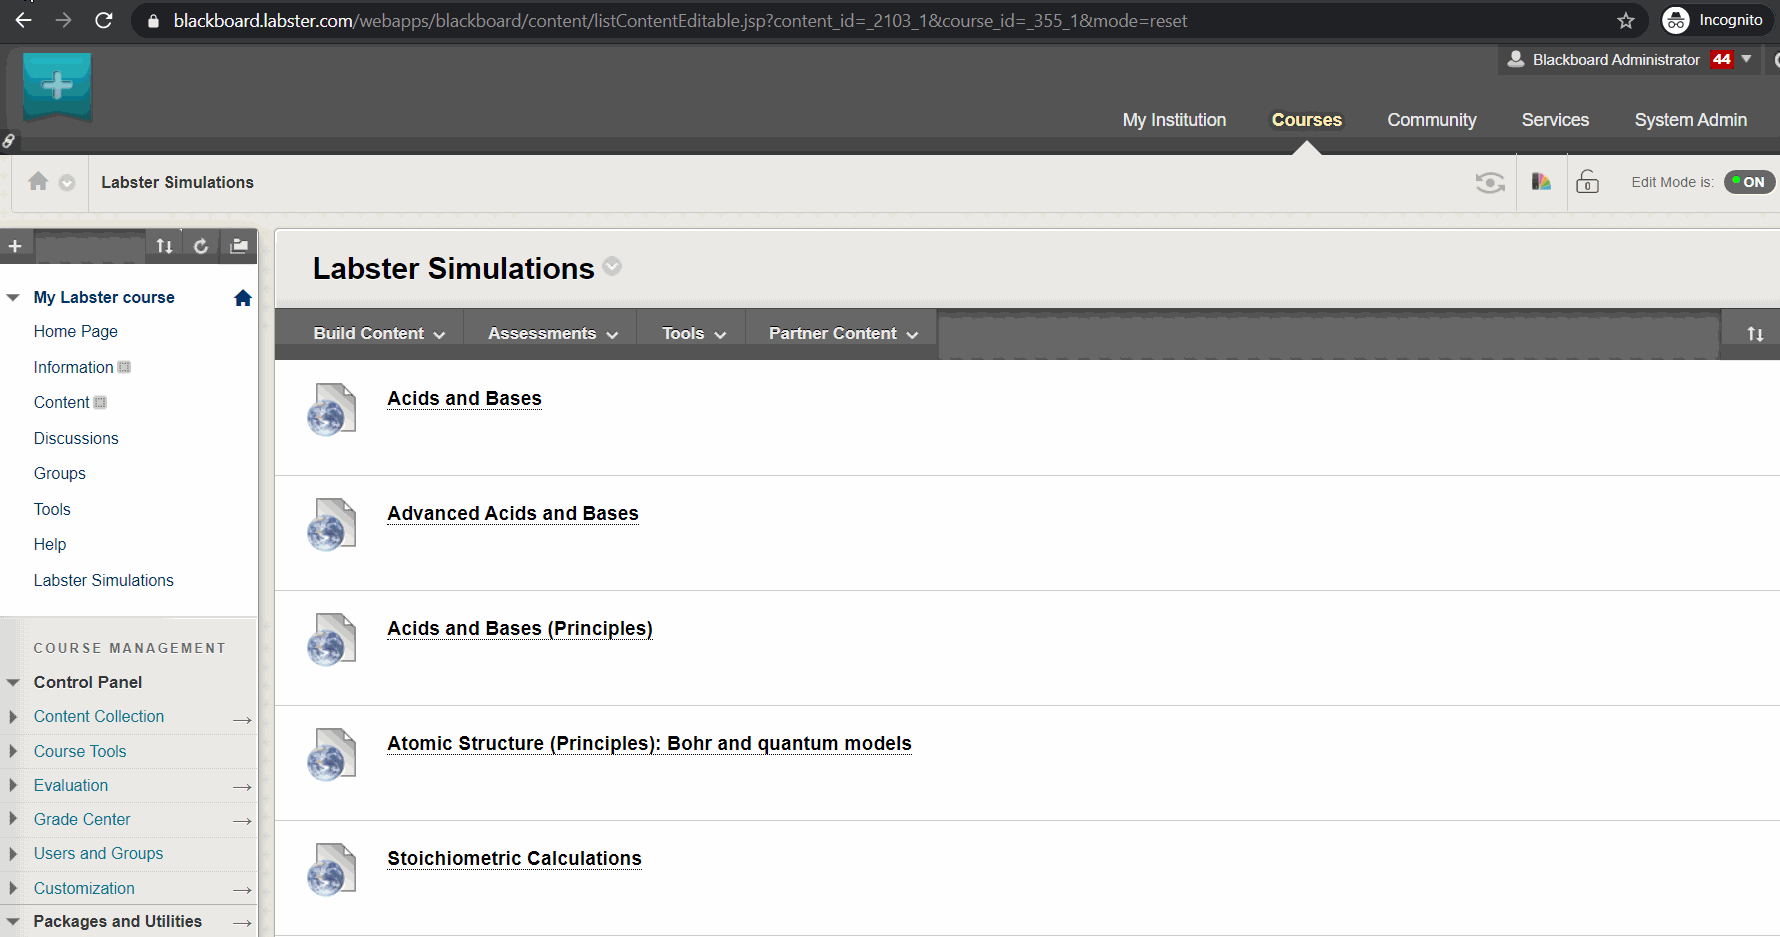
- Select Labster Simulations menu on the left-hand side panel
- Click on a simulation > Click the check mark icon ✔ > Edit
- Make sure the following fields match the description below:
- Enable Evaluation: Yes
- Points Possible: 1
- Visible to Student: Yes
- Open in New Window: Yes – 👀 This is critical❗
- Permit Users to View this Content: Yes
4. Press the Submit button
5. Repeat the steps above for each simulation you would like to add to the course
Step 3: Enter your license code**
**Note that you may omit this step if your institution’s Labster setup does not require it. If you are asked to, please follow the steps below to enter your license code. (Does USC require this?)

- Launch one of the simulations in the course. If the simulation starts loading without asking you to enter a license code, you can ignore this last step.
- If prompted to enter a license code, paste or select your license code and press the Apply button. It is important you enter the license code matching your course.
✔ Your students can now access Labster simulations from your course and your grades will appear in the Labster dashboard as well as your Blackboard gradebook
Important Notes
- Please note that you must not alter existing activities/assignments by modifying the simulation URLs. Doing so would affect the grading.
- In the case where you have been provided with several common cartridge files, please ensure that you remove simulation duplicates from your course before you publish the assignments. In case a simulation appears twice under the Assignments section, it will also appear twice in your Canvas gradebook.
- If required by your institution guidelines, you can add the link to Labster’s User Terms and Conditions as found here: https://www.labster.com/terms-and-conditions/ (Does USC Require this?)
About grades
Each .zip file contains a link to the Labster Dashboard, which will get added to your course together with the simulations. Make sure that you do not enable evaluation for the Dashboard.
Your students can take the Labster simulations as many times as they wish. This means that students may generate several grades for each simulation.
This Blackboard Webinar recording demonstrates the implementation process and provides additional context you may find helpful:
Understanding the Labster Dashboard
To review your students results, you need to open your Teacher Dashboard. Simply launch any simulation and click the ‘Dashboard’ link on the left hand side menu.
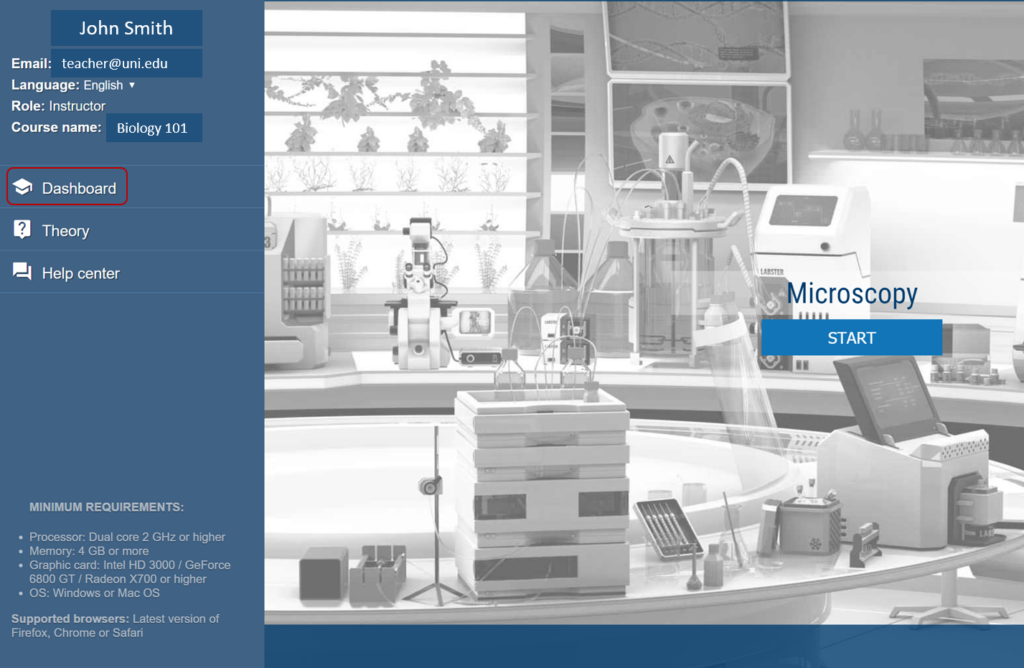
Your Teacher Dashboard will open in a new tab.
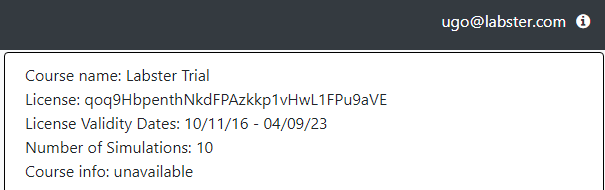
General Course Information
Click the information icon on the top right corner (to the right of your email address) to see:
- Your license information
- Your students’ survey score
Viewing Student Results
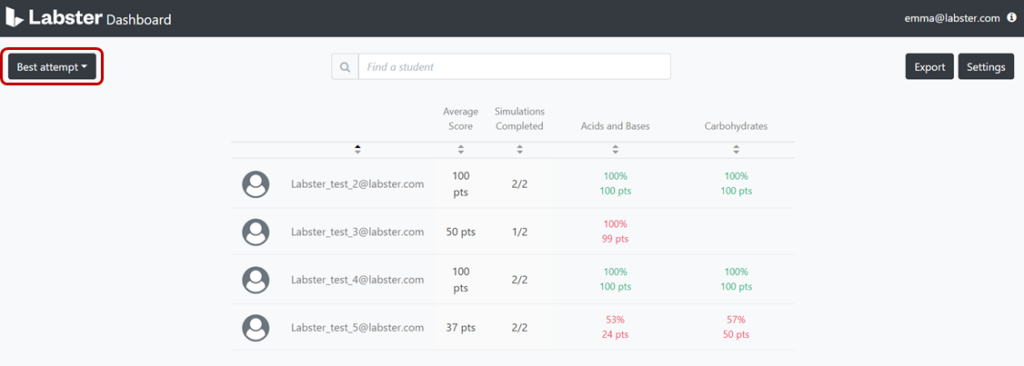
The Teacher Dashboard allows you to see the following information:
- Number of Attempts: The number of times a student tried the simulation.
- Score in %: This is calculated by taking the number of points the student achieved divided by the total number of possible points.
- Completion %: The percentage of the simulation that a student has completed.
Sort by Column
You can sort the view by using the arrows at the top of each column:

Filtering options
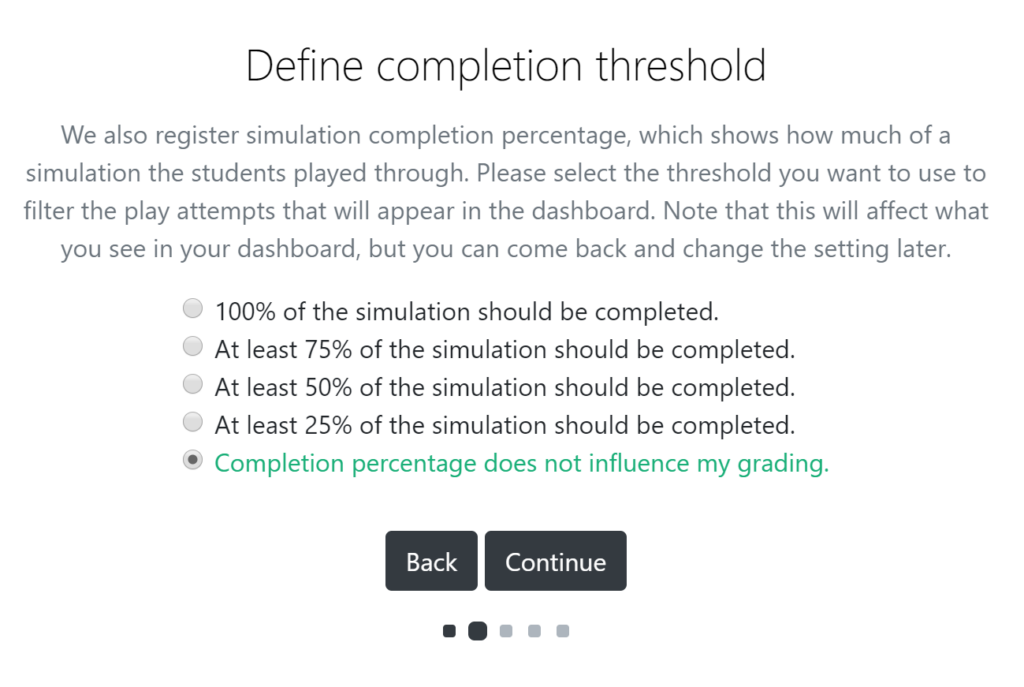
In the Settings section, you can filter your view at any time according to the following parameters:

- Simulation displayed: you can choose to see all simulations or a specific simulation.

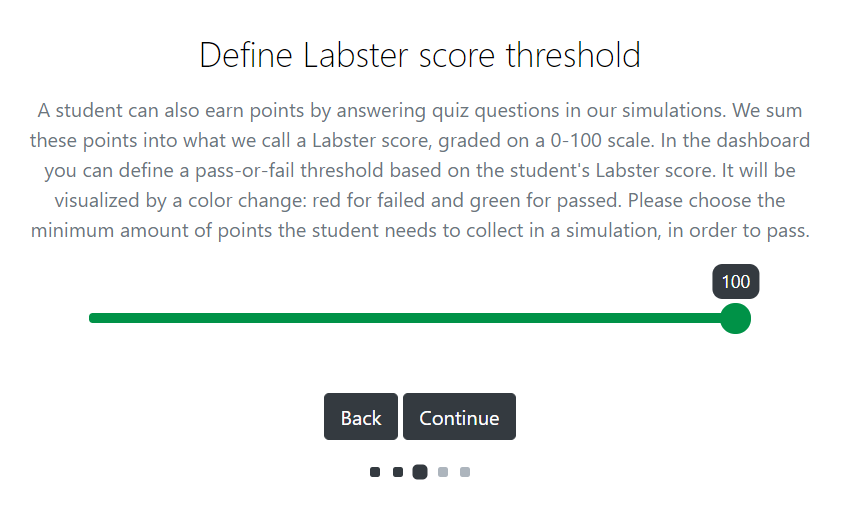
- Completion threshold: only the attempts that meet the completion threshold will be displayed. Please note that this applies to all simulations.
- Score threshold: visually differentiate between passing and failing attempts. The attempts below the defined threshold will appear in red whereas the attempts that meet or are above the threshold will appear in green. Please note that this applies to all simulations.
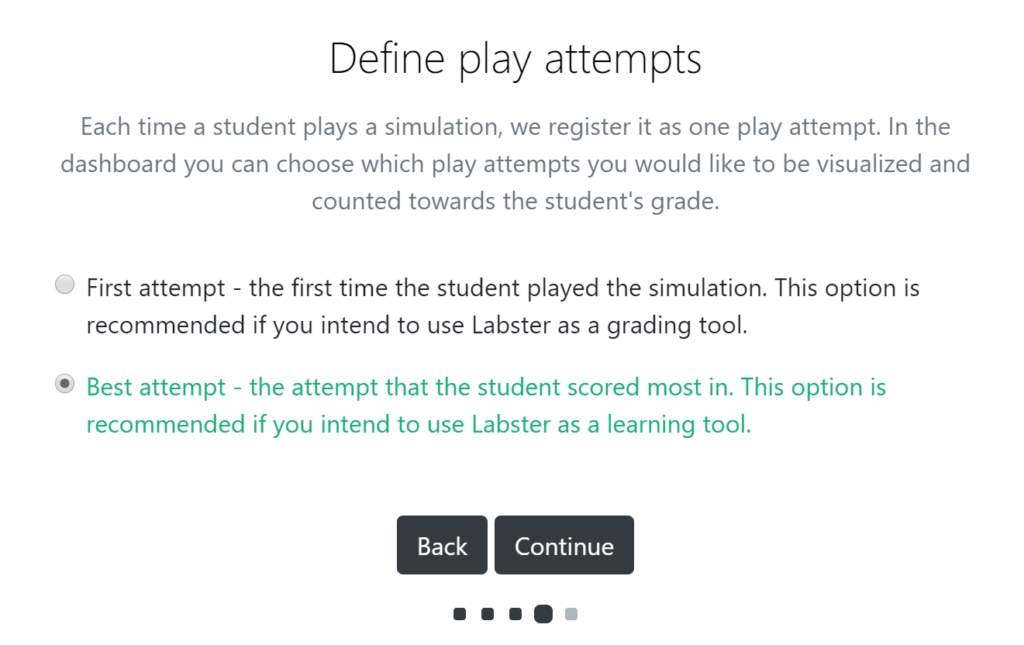
- Best attempt or first attempt: choose to view students’ best attempt (highest score) or first attempt. Please note that this applies to all simulations.
The shortcut to the Best/First Attempt display functionality is also accessed from the top left corner:
View Student Attempts in the Dashboard
Click on students emails to expand the view and see all of their attempts:

Click on an attempt to view more details, including downloadable quiz question answers:

Exporting Student Results
You can export the dashboard data in a .xslx format by clicking on the ‘Export’ button. Please note that the filters that you have selected will apply to the exported data. You can modify the filters at any point.
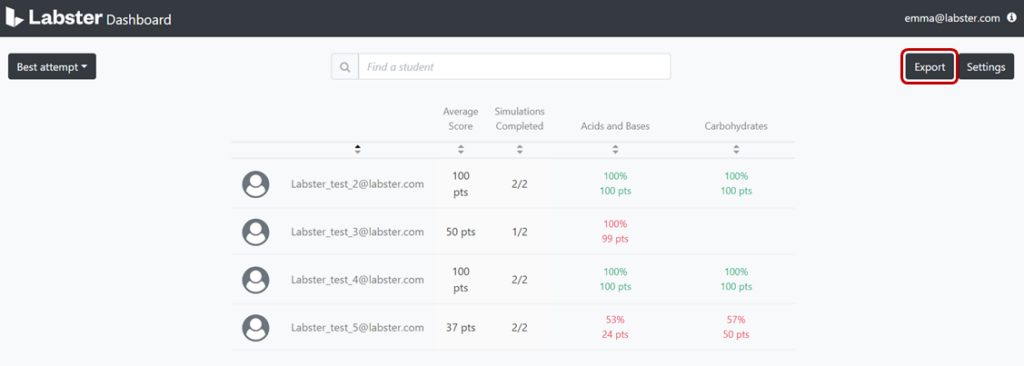
If you have integrated Labster into your Learning Management System, please note that the selected filters do not impact which grades are sent to your LMS gradebook.
Sending Labster Grades to LMS Gradebook
Grades are sent automatically
If you are accessing Labster simulations from your LMS course, grades will be sent automatically, once students complete a simulation (progress = 100%). Your gradebook may display the first, last or best grade obtained by your students, depending on your setup. Your LMS administrator is able to update this parameter for you, by updating the custom parameter of the Labster LTI tool provider according to the table below:

If you do not add any custom grade parameter, by default your gradebook will display the best attempt’s grade. Real-life example: A student plays the same simulation twice. They complete the simulation for the first time and get a score of 60 out of 100. The same student completes the simulation for the second time and gets a score of 70 out of 100. Only the best completed attempt will be visible on Canvas gradebook which in this case is 70.
Please note that updating the filters in the Labster dashboard does not result in updating the grades in your gradebook.
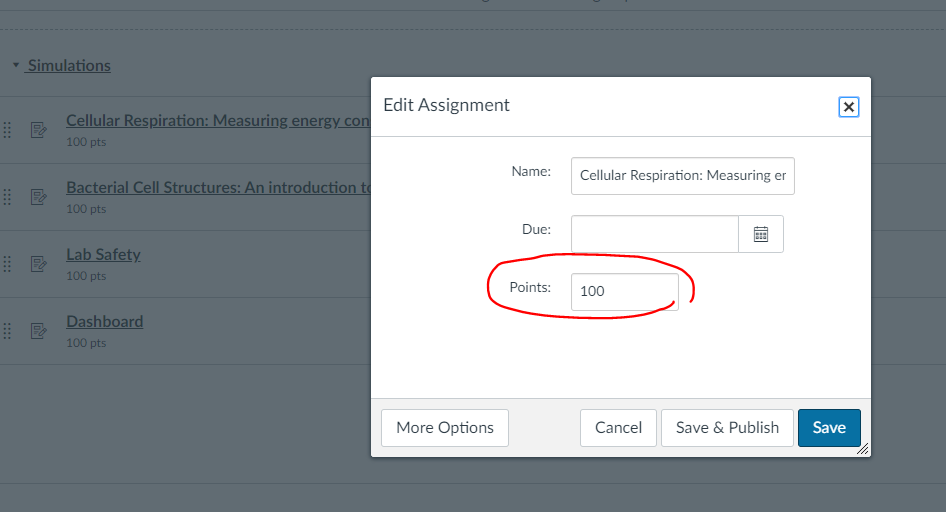
Assigning points to each simulation
Like any other assignment, each Labster simulation can be assigned specific points. Changing those points will impact the grade percentage in your gradebook for future grades. Some LMS, like Canvas, require grades to be re-sent in order for the change to take effect on already obtained grades.
Grades not showing up on Gradebook
In rare cases, grades may not be properly sent to your LMS (for instance if students internet disconnects during play). If this happens, please report the missing grades to Labster and they can trigger a manual update/resend of those student grades.
Important: make sure you include the email of each student and your license code if relevant so that we can easily resend the grades.
Labster Requirements
Minimum System Requirements
Labster simulations can only be used on laptop or desktop based computers, which meet the following requirements:
- Processor: Dual core 2 GHz or higher
- Memory: 4 GB or more
- Graphic card: Intel HD 3000 / GeForce 6800 GT / Radeon X700 or higher
- OS: Latest version of Windows (64-bit) or Mac OS or ChromeOS
- Supported browsers: Latest version of Firefox and Chrome
- A stable internet Connection
Important: Labster simulations do not yet run on mobile devices such as smart phones and tablets. Labster is working on adding this in the future.
Chromebook Support
Labster’s virtual lab simulations are accessible on Chromebooks that meet the minimum specifications above. Since there are many different Chromebooks, it can be difficult to determine if your specific Chromebook meets those specifications. See Chromebook minimum requirements.
How to update your operating system to the latest version
Windows
To update your Windows 8, 8.1, and 10 Operating System:
- Open Windows Update by clicking the Start button in the lower left corner. In the search box, type Update, and then, in the list of results, click either Windows Update or Check for updates.
- Click the Check for updates button and then wait while Windows looks for the latest updates for your computer.
- If you see a message telling you that important updates are available, or telling you to review important updates, click the message to view and select the important updates to install.
- In the list, click the important updates for more information. Select the check boxes for any updates that you want to install, and then click OK.
- Click Install updates.
For information on Microsoft Windows Automatic Updates, visit Microsoft’s Update.
Windows 7- End of support: After January 14, 2020, Microsoft will no longer provide security updates or support for PCs running Windows 7.
Mac OS
- Click the App Store icon.
- Click the Updates tab.
- If any updates to the system are required, they will appear on the list.
- After updating, please restart your system before entering the lab again.
Note: It is important that you do not shut your computer off or allow it to run out of battery during the update process. Doing so can cause a corruption of the operating system, which can often only be fixed by reformatting the computer.
Supported Web Browsers
Please ensure that you have installed at least one supported browsers and that you have updated it to its latest version in order to run simulations. Labster currently supports:
- Mozilla Firefox on Windows and Mac computers
- Google Chrome on Windows, Mac and ChromeOS computers
Important: Safari is not supported. Some simulations currently present issues on Safari.
Labster simulations do not run on the browsers mentioned above if you are using mobile devices such as smart phones and tablets.